Most voice recording sounds better with a little bit of compression applied. It’ll make the quieter bits louder, and make the louder bits quieter. In addition, there’s usually a little bit of noise that is picked up even with the best of microphones. It’s just a fact of audio life.
Thankfully OBS has two great filters that can be used in combination to great effect, first compressing your voice, and then adding a bit of noise reduction afterwards. I’ll show you how to do it, and the values that work well for me in this article.
Applying the Compressor
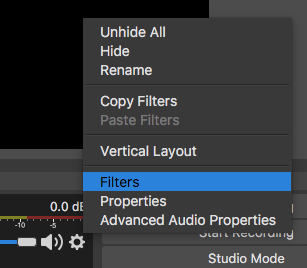
Depending on which audio source you use, you can either right-click your mic in the source window, or click on the little gear icon in the Audio Mixer panel, then select Filters.
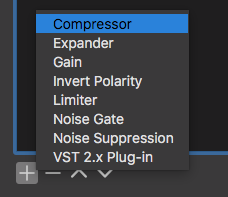
Now pick the Compressor filter and add it. You can leave the name as the default, or name it something different if you like.
The default values work well, but you can tweak some of them for your needs and preference. Here’s what I’m using on my setup:
- Ratio: 10:1 (default)
- Threshhold: -18dB (default)
- Attack: 6ms (default)
- Release: 60ms (default)
- Output Gain: 0dB (default)
The Output Gain will amplify your signal after compression. If you need an output boost, you can tweak the value here. Watch the levels and don’t go too high though, or you’ll distort your signal. You can always use the slider in the Audio Mixer to bring it down again for finer control.
Leave the Sidechain/Ducking on its default value (none). This is a powerful feature to dim the audio of another source when you narrate over it, but it’s not applied on the microphone. I’ll tell you more about it in this article.
Applying Noise Reduction
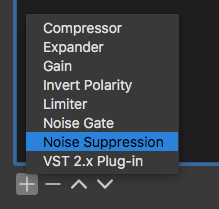
Now that we have our compression sorted out, let’s add some noise reduction. Just like before, add another filter to the same source, but pick the Noise Suppression filter this time (NOT Noise Gate).
This filter only has a single option, namely Suppression Level. This is the amount of the signal that is seen as noise and is capped off at the bottom. The default value of -30dB is a little harsh, so I set mine to -50dB. It depends on the amount of noise you can hear from your mic. Do a test recording with different settings and see what works best for you.
It’s important to apply the Compressor and Noise Suppression filters in the correct order: don’t de-noise the signal before compression, do it the other way round – otherwise you’ll end up with something rather yuck. Order does matter!
That’s it! Feel free to fine tune the levels and experiment. When used in combination, these two filters will make every mic (and your voice) sound like a million dollars.