I’ve been meaning to put this quick guide together, with helpful bits of equipment and software that you need to get started in the world of streaming. I also wanted to explain the principles in a not-too-technical way. Here’s what I’ve come up with! This guide includes some philosophy, general tips, some basic kit suggestions, as well as “extra credit” optionals with affiliated links to the products I’m talking about. I hope you get some information out of this list!
If you have any questions, feel free to ask in the comments and I’ll try my best to help if I can.
Table of Contents
- Introduction
- Console Streaming (solo)
- Console Streaming (via desktop or laptop)
- PC Streaming
- Streaming Software
- Single vs Dual Monitor setups
- Audio and Microphones
- Web Cams
- Video Quality
- Overlays
- Chat
- Chat Bots
- Switching Scenes with Stream Deck
Introduction
There are various ways to get the same thing done, and every single stream is completely different. There’s no right or wrong way to get to the goal. I’m assuming here (foolishly perhaps) that you want to stream something that happens on your screen. This could be a video game, or any other piece of software. I’m assuming you’d like to narrate over it and perhaps appear in vision. I’ll try my best to do that. While I’m at it, I’ll also explain how you add an overlay for subscriber notifications to your stream, how you keep an eye on your chat and how to moderate it.
I say “foolishly” because many may not be interested in some of these aspects. I’ve seen people take out their mobile phone and stream a cooking session, or a walk in the park, or even stream a canoe ride on a river. Those are different setups, and I might cover these in another article. For now, I assume your home/office bound with something to share on a console or a PC.
Let’s get started!
Console Streaming (solo)
If you’re a console gamer who wants to share some game play, the good news is that you might already have everything you need in place. Both the PS4 and the Xbox can natively stream to Twitch, while the PS4 can also stream to YouTube and the Xbox can stream to Mixer. That’s a great start! All that’s necessary is an account for your preferred streaming provider and off you go. There’s nothing to configure, so it’s really easy to get going.
While the setup works to share straightforward gameplay, the customisation and quality options are limited. You can add a microphone on your console via the respective headsets and fiddle with the voice/game volume to find the right mix, and you can even add a web cam to show yourself while you’re playing. However, the positioning and crop of the camera might not be exactly what you want. At the same time, technically you don’t need any more equipment than that. Note that web cams are proprietary for the consoles; regular USB web cams do not work.
Console Streaming (via PC/Laptop)
To greatly improve the quality of your stream, you need to grab the output of your console and capture it on a desktop or laptop using a HDMI Capture Device. These come as either a USB or PCIe devices, the former being the only option if you have a laptop. Several manufacturers make them, Elgato being the most known brand in the genre. I’m using the Elgato HD 60 Pro, but I also own an AGPtEK / MyPIN USB device.
The difference between a USB and a PCIe devices is capture speed rather than the quality. Both can deliver excellent (or terrible) pictures, but the time it takes them is different. Both deliver data to the bus of your computer, but the PCIe card hooks straight in, whereas the USB device needs to speak to the USB controller first, which then inserts data into the bus for further processing. The result might be a few frames delayed, and you need to account for that when adding a microphone to the mix.
USB devices rely on your computer to do the encoding, and your computer in turn can either encode the stream with its CPU or it’s GPU (graphics card). The latter is usually a better option, but it depends entirely on how powerful (or recent) either device in your system is. For laptop users, USB devices are the only option (the cheapest one I’ve seen is $12 – I’d love to test it out one day).
PC Streaming
If you want to share gameplay from a PC, you don’t need any other devices to do so (unless you want to). Note that this presents additional challenges for your system resources: not only does your PC need to work hard to render the game (or software) in the first place, it also needs to take its own signal, compress and encode it, and send it out again.
The good news is that most recent NVIDIA GPUs have a dedicated hardware encoder that can do this with little overhead. Beginning with their Kepler architecture (Quadro K series / GeForce 700/800 and above) such encoders have become better and better at rendering the game and a stream at the same time, with RTX 20xx cards being the best at the time of writing.
Even if your GPU is not powerful enough to cope with the game you’re playing and streaming at the same time, you can use the CPU to encode your game. A quad core or above processor is recommended, and essentially the more threads you have available, the better your performance will be.
Streaming Software
No matter from which source material you intend to stream (console or PC), you’ll need a piece of software that brings together your video and audio sources and presents an interface for you to create what your viewers will see. It’s the heart of the operation. Various options exist, to name a few popular ones:
- OBS – Open Broadcaster Software (that’s what I use)
- Streamlabs OBS (a fork of the above with additional options)
- XSplit
- NVIDIA GeForce Experience (formerly Shadow Play)
- Elgato Game Capture HD
Typically these apps allow you to layout the video sources, mix audio sources, add overlays, roll video clips, play music and switch between various sources with keyboard shortcuts or via other means (like the Elgato Stream Deck). The also need your stream key or your streaming provider’s credentials to deliver the signal. Some come with an integrated chat window that allows you to keep an eye on your audience, all from one window. Pretty neat!
I’m super happy with OBS, an open source software that’s available for free. It may look intimidating at first, but it’s a reliable partner on this tricky journey. I’ve made several videos about OBS on my YouTube channel, including a series that gets you started with the whole process. More episodes are coming soon.
Single vs Dual Monitor setups
Before we talk about more technical aspects, let me touch on something that may seem either obvious, or very difficult to comprehend. It’s about how to do two things at the same time, i.e. focus on the game you’re playing, while keeping an eye on the chat window and perhaps other technical aspects (like a return feed of your stream). What’s the best way to handle this?
You guessed it: multiple monitors (two is a good start). These can either be attached to the same computer, or if you wish you could have a second computer for the task. I generally keep a dedicated chat window and my stream return feed on the right, while playing a game or using a piece of software on the left in full screen. On such a setup, the second monitor could also show the streaming software, which makes it easy to switch between several scenes (like your game, your camera in full screen, a holding loop or a title sequence).
Two or more monitors however is a luxury not everyone can afford – either for cost or space reasons. I have several streaming setups, and small spaces have big issues. In such cases, there are other ways of working: with a single monitor that displays the game in full screen, and a mobile device for the chat (a phone or tablet will work nicely). Some streaming providers like Twitch have a nice app that lets you just watch the chat without a video feed, or they let you disable it.
If a second device is also not an option, you can play your game in windowed mode and display other things alongside it in the background. While not ideal, it allows you to see the chat on the same screen. That’s not everyone’s cup of tea, but it works when it has to.
Here’s another way to tackle chat and game on a single monitor setup: I use a free chat app from Restream.io (available for Mac and Windows). Aside from being able to read and relay multiple chats from various platforms, it has the advantage being displayed on top of an active software window without being captured in the process. That way I can see my game in full screen, while at the same time a chat overlay is shown that only I can see. It’s insensitive to mouse clicks too, very handy for single monitor setups. Nate mate a video about the Restream Chat app.
Audio and Microphones
Some argue that video is more important than audio quality. I disagree: if I had to choose one over the other, audio is more important – simply because it works without the video. A mute video of a talking head is useless. At the same time, since we’re delivering both video and audio in a stream, both should look and sound their best.
Sound in our case is a combination of your voice and the game audio. Engineers call this mixing, and you want to make sure your voice isn’t drowned out by the game audio. You also want to make sure your game audio can be heard in the background. You can even automatically dim it down when you speak, via a process called audio ducking. I’ve explained how to set this up on OBS in this article. Lastly you need to keep an eye on the overall output levels: your audio shouldn’t be too quiet, nor should it be so hot that it distorts. It’s a tough job!
Let’s start with talking about the microphone first. You’ll need one to capture your voice. A decent mic doesn’t cost the world: gaming headsets have one included, and the added benefit is that they’re close to your mouth by default. Make sure not to breath into it, keep it at chin height. Gaming headsets have the advantage that you’ll be able to hear your game audio without it accidentally coming back into your mic (that’s what speakers would do). Hence, a gaming headset is a good start if don’t have anything else. I’ve tried several models, and they get the job done:
- Butfulake Green Camo (3.5mm and USB)
- Jeecoo Pro Gaming (USB)
- Jeecoo N13 (3.5mm)
While these all sound OK, if you fancy something that sounds REALLY good, have a look at a standalone microphone like the Blue Yeti or Zaffiro. I recommend a shock mount and a desk stand so it “hovers” in front of your mouth. They’re more expensive than a gaming headset, but also bring better sound quality:
- Blue Yeti (seriously good)
- Zaffiro Microphone Kit (comes with desk arm, shock mount and pop filter)
Things I cannot recommend are built-in microphones, then ones in a laptop or in a web cam. While they are better than nothing, they tend to sound very tinny and pick up a lot of room sound and other noise. By all means try them out, but don’t be surprised if they sound disappointing.
Aside from the equipment itself, every microphone’s quality can be improved with the use of filters in your streaming software. Your voice will sound better when you add a bit of compression and noise reduction, no matter how good your microphone is. Consoles often (over-) do this automatically, but when you’re using a streaming software you need to take care of if yourself. I’ve explained how to add a compression filter in OBS, while DreamLab has explained what a compressor actually is and how it works.
Web Cams
Up until this point you can already share your gameplay with narration, and with practice and many test recordings, it’ll sound fantastic. Most streamers add a web cam to the mix though. This gives an immediate visual connection to you, and while I understand that many of us humans are camera shy by default, think of it as a video phone call. It’s a bit of fun and doesn’t have to look like a TV studio. Having said that, with a few simple tricks it’s not that difficult to make a cheap (or expensive?) web cam look extremely interesting.
Let’s start with the camera itself. There are plenty of options:
- a dedicated web cam (like a Logitech C922 or a C930e)
- a built-in web cam from a monitor or laptop
- a mobile phone with a driver (like Epoc Cam for iOS or DroidCam for Android)
- a DSLR with HDMI output (requires a capture card and additional resources)
Whichever option is right for you will depend on your budget and technical ability, as well as your patience. I encourage you to use what you already own rather than investing into a web cam from the start. I’m writing this article during the COIVD-19 crisis, and web cams are scarce and super expensive right now. A model from many years ago might do the trick considering that it’ll mostly be used as a stamp-sized inset in the corner somewhere. Don’t let that 4K web cam for $300 tempt you – it’s not worth it, nor is it necessary. As long as the frame rate is around 30fps, resolutions as low as 320×240 are acceptable (seriously).
Alternatively, use a mobile app that turns your phone (or your old spare) into a camera that easily exceeds what a web cam could deliver (see links above for Epoc Cam and Droid Cam).
What’s most important for any camera to deliver good pictures is lighting. The most expensive camera looks awful when the lighting isn’t right. A window or another light source behind you isn’t a good idea. A small and inexpensive ring light illuminating your face will do wonders and costs less than $20. Tweak the brightness and colour temperature until you look like a million dollars.
For extra credit, add a few LED lights in your background, and dim the room lights a bit. Even the most boring room look extremely interesting with simple effects when balanced out well. Try these ones, they’re water proof and change colours automatically (remote control included).
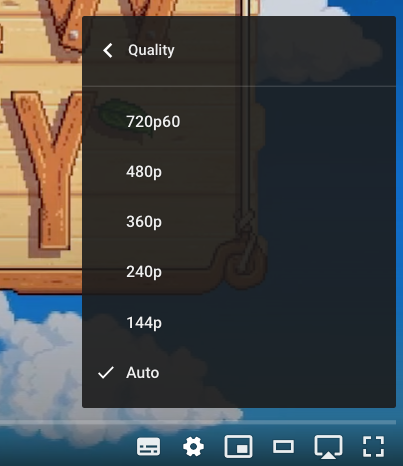
Video Quality
Let’s take a moment and talk about the video quality of your stream. We’ll explore resolution and frame rate, bitrate and how to go about determining what’s best for your own and your viewers’ situation. Bigger isn’t always better, as we will soon discover.
If we could, we would all stream at 4K with 240 frames per second, preferably uncompressed to keep streaming artefacts down. Sadly this would require hardware unaffordable to most of us, and un-congested data lines to and from everyone’s home far exceeding “that new gigabit deal” you’ve heard so much about. The reality is that most viewers watch a stream on a mobile device or a desktop, with the chat next to it.
Streaming at 1080p in either 30 or 60 frames is very possible for many of us, but again it might not be your best option, as the additional resolution might not be detectable by most viewers (keep in mind, I’m writing this article in June 2020, and by the time you’re reading it, our viewing habits may well have changed). We need to take into consideration how much data we can send out, and how much data our viewers can receive. This in turn will determine how much data we should produce and subsequently send out.
Take a look at your upload speed using the free website speedtest.net. Run the test a few times, preferably at different times of the day, and take note of your upload speed. Halve it and take this as your maximum upload speed. You can stream at a higher data rate, but be aware that due to congestion on the network, this value may be unstable every once in a while. Err on the side of caution and leave some headroom for such eventualities.
Now let’s determine what bitrate we should use for what resolution at what frame rate. Here’s a quick guide that each streaming provider shares (this one is a middle ground based on recommendations from YouTube, Twitch and Mixer):
- 2160p (4K UHD) at 60fps = 20 – 50 Mbps
- 1080p at 60fps = 4000 – 9000 Kbps
- 1080p at 30fps = 3000 – 6000 Kbps
- 720p at 60fps = 2000 – 6000 Kbps
- 720p at 30fps = 1500 – 4000 Kbps
- 480p at 30fps = 500 – 1000 Kbps
Depending on what your hardware can handle, I recommend streaming at 720p 60fps, or if you can 1080p 60 fps, if your upload speed allows for 4000 Kbps or more. The higher frame rate will show the fluid motions we like to see so much in high motion gaming. If resolution is a priority, as it might be in software demonstrations with small menu text, a lower frame rate in favour of a higher resolution works fine too.
Implications for your Viewers
There’s an important thing to keep in mind, depending on the streaming provider you’re using: not every viewer has a strong and fast internet connection. Some are on metered connections, some might be on mobile or slower connections. If you send 6000 Kbps, your viewers need that as a minimum download speed to watch – unless you have transcode options on your stream.
Those are lower resolution versions of your stream that are sent out in parallel to your hi-res stream. The player is clever enough to switch between them almost seamlessly, adjusting automatically for the most fluid viewing experience. Netflix and Amazon Prime do the same thing, which is why your favourite show might end up looking pixelated all of a sudden.
YouTube makes transcode options available to every streamer and on every video, while Twitch and Mixer only guarantee this feature for partners. Twitch affiliates sometimes get transcodes, depending on availability, while Mixer streamers can sign up to Mixer Pro and get them guaranteed for a monthly fee. At the bottom of the player, viewers can set which resolution they’d like to see, depending on their internet speed.
Without transcode options, viewers can see only the bitrate you’re sending, or nothing at all (it’ll show “source” to signify the signal from your end, something that I’m dearly missing on YouTube).
Overlays
You may have seen dynamic overlays that streamers add to their feed: donation tickers, subscriber and follow alerts, chat windows and all kinds of over stuff. It’s a complex topic that I won’t explain in detail, but I wanted to touch on it here.
Most of these things are provided by third parties like Streamlabs or Stream Elements. They do not require an account, and instead will ask you to login with your streaming provider’s credentials. This allows them to tap into the respective API and display a transparent animation and audio when something happens (such as a donation or a follower on your account).
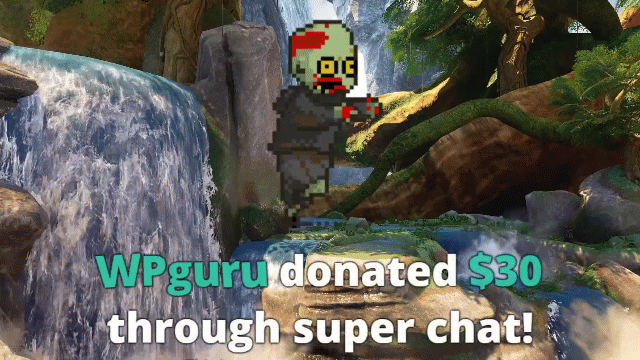
In return you’ll get a cryptic URL that needs to be added as a browser source, remaining above the main game play window on your streaming software to be visible. The links above have more details on how to integrate these with your streaming software.
Overlays for Xbox Streamers
There’s an additional Mixer Pro perk for console streamers who wish to stream without access to a separate PC or capture card: when enabled, your signal passes through something called Lightstream Studio, allowing such overlays from the convenience of a web browser. The output of Lightstream Studio is then routed to your Mixer account, bringing all the fun of overlays to those streaming directly from.
Lightstream Studio is a paid service, but Mixer Pro subscribers get this perk for free – no matter if you’re streaming from a console or another device.
Chat
The most exciting thing about a live stream is the immediate interaction with your audience. While some viewers are just there to watch and “lurk” as the kids say (meaning they’re not participating in the chat), other viewers like to have a conversation. You can read messages out and respond to them, or simply respond in your own time without reading them out.
Every streaming provider has their own version of a chat window with varying features. Some even have commands you can use to set the title or game, send private messages to other users in the chat, or to start polls and giveaways. I’ll try to keep it as general and short as possible here.
You get access to your chat usually on the watch page of your stream, which gives a good opportunity to see if you’re live or if there are any disruptions on your signal. The chat window is on the left of the video player by default, which isn’t always ideal. You can separate it by selecting the pop-out chat option at the bottom, then position it however you like.
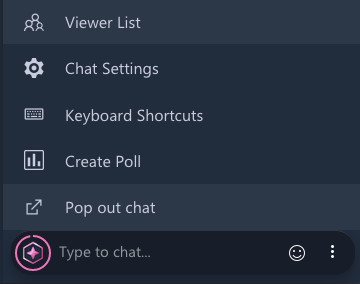
You can mention people in the chat by prefacing their username with the @ symbol, and you can perform special actions on them, usually by right-clicking on a user name. For example, you can make someone a moderator, put them on a time-out or ban them entirely.
Some chats have a slow-mode option, which will let users post message at pre-determined intervals. A 30 second slow-mode chat means each user can only post one message every 30 seconds. That can be useful for very busy chats, or those cases in which users think posting single words every 2 seconds is a fun idea. You can also disallow the use of links in chat to combat spam bots and trolls, but let’s hope that won’t be necessary.
As your chat gets busier, you may feel more comfortable with trusted moderators by your side. That’s a chat role with elevated privileges, given to someone who can approve links on your behalf, delete messages and ban people when necessary. Twitch and Mixer use the /mod command, followed by the user name. YouTube uses a menu for that. Here are some details for each streaming platform:
Chat Bots
Some streamers employ chat bots to make the viewer interaction more interesting. People can play games, bring up links via shortcut commands, or be greeted automatically when someone follows. Chat bots are scripts that run in the background and require a separate account from your streaming account to post messages. They’re not necessary to run a stream, but they can be a fun and helpful tool by your side.
Some bots are standalone programmes that need to be run on a local computer, while others live entirely “in the cloud” and as such are always logged on and ready to respond when you go live. I won’t go into the details on how to use bots here, instead I’ll provide you with a list of popular chat bots to explore at your own leisure:
- Streamlabs Standalone Chat Bot (Windows only)
- Streamlabs Cloud Bot
- Night Bot
- Moo Bot (Twitch only)
- Scottybot (Mixer only)
- MEE6 (Discord and Twitch only)
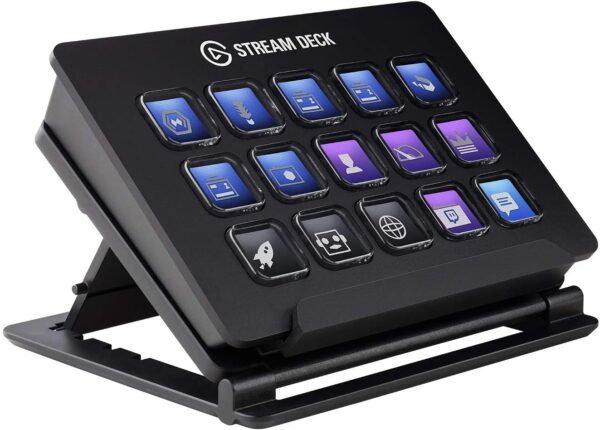
Switching Scenes with Stream Deck
A very useful yet optional accessory is the Elgato Stream Deck. It’s a standalone keyboard device that integrates with OBS and other streaming softwares to do all kinds of interesting things. With Stream Deck you can
- switch scenes, and see which scene is live
- mute and un-mute your mic (like a cough button)
- enable and disable overlays
- start and stop streaming or recording
- play sound effects
- kick off multiple actions with one button
- post chat messages
- and so much more
Stream Deck comes in several physical sizes, as well as iOS and Android App with an annual subscription. It’s well worth the money, especially if you don’t have a second physical at your disposal. I’ve described how to set it up in this video.
- Buy Stream Deck Mini (6 buttons) from Amazon US
- Buy Stream Deck (15 buttons) from Amazon US
- Buy Stream Deck XL (32 buttons) from Amazon US
Multi-streaming
With so many streaming providers to choose from, which platform should you pick? It’s an excellent question, and one that’s not easy to answer. It stands to reason that time and experience will tell, but if you haven’t for either, what’s the answer? This is where multi-streaming may come in. It’s entirely optional, but I wanted to mention what it is and how it can be helpful in making a decision where to invest your time and energy (both of which are scarce resources).
Simply put, multi-streaming is the process of sending your stream to multiple platforms at the same time. Rather than streaming only to Twitch, you’d send the signal to Twitch, Mixer, YouTube, DLive and Facebook at the same time. The advantage is that you’ll see which platform responds best to your type of content, and it’ll allow you to make a very personal observation on where your audience discovers you.
While this sounds like the ideal scenario, there are some caveats you should be aware of. For one, the organisational overhead is huge. Not only do you have to setup one profile, you’ll have to setup several. You’ll also have to change the title and game on multiple platforms occasionally. Then there’s the chat. Technically you’ll have to keep an eye on multiple chat windows (as if one wasn’t enough). Thankfully there are solutions that combine multiple platforms into a single window, but again it’s not quick and easy to get going.
I know of two providers that can relay your signal to multiple platforms: Restream and Castr. You can also stream to multiple destinations via OBS too, without a third-party provider. Without delving into the details, it’s something to think about if you’re wondering how a different platform might feel to stream on.
Contractual Considerations
While most platforms allow multi streaming, things can become contractually complicated when you start signing agreements. Twitch affiliates for example have a clause in their default contract that requires any content to remain on Twitch for 24 hours, before it’s allowed to appear anywhere else. Mixer and YouTube do not have such a clause. As a beginner this is not an issue, but as soon as you put your signature onto something that promises cash, it’s best to read the small print.
Conclusion
It’s been a long article! I was considering splitting these topics up into individual posts. I’ve left out such riveting topics as monetisation, social networking and audience growth. I considered going into way more detail here and there, hell I’ve considered writing a book about the whole process and narrate it. Then I realised that I just wanted to make this a really quick introduction and that “getting it done” was more important than to turn it into a 6 months project.
I’ve left out a lot, especially the nitty-gritty technical details. They can be found elsewhere on my site, or though Google, authored by folks more knowledgeable and experienced that I’ll ever be. One important aspect of streaming is the part about “how to do it mentally”, dealing with the stresses and audience engagement questions. I might cover this another day in another article.
I feel that this post is part of a larger series on the whole subject of streaming, which I’ve also covered in an ongoing and not-quote-yet-finished series on YouTube, entitled Streaming 101. You can watch it here:
That’s it for today! Let me know if you have any questions below, or drop by one of my development live streams. If this article was helpful, please share it with friends, family and total strangers, or consider supporting me.