I have a Mac and a PC on my internal network. Frequently I need to access files from either machine, depending which machines I’m working on. I have previously explained how to access Windows files from a Mac, so this article describes the other way round: how to access your Mac files while you’re working in Windows.
On the Mac
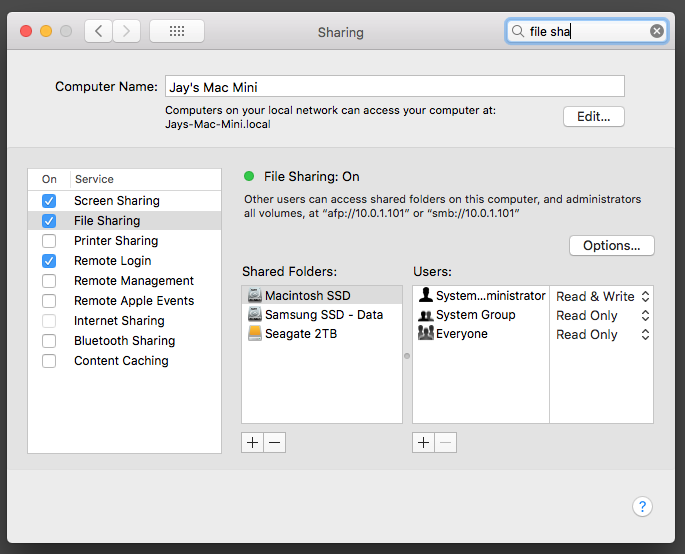
We need to enable File Sharing on the Mac so that paths can be shared. It’s disabled by default for security purposes. Head over to System Preferences and search for File Sharing and you’ll get to a window like this.

Enable File Sharing on the left hand side, then add the paths you’d like to share. You can add particular users if you’d like to do that and give permissions as you see fit, but if it’s just you (being the Administrator and all) you can leave leave it. Verify that the System administrator has read and write privileges, that way you can store files on the Mac from Windows and delete them when necessary.
On Windows
Thanks to macOS’s similarity to Linux this is relatively easy. Open a Windows Explorer and right-click on My PC, then select Add a network location.

A friendly wizard will open, helping you to connect to your remove location. Find out the IP address of your Mac (preferably a static one, otherwise the connection will break when it changes dynamically). Type it into the window and preface it with two backslashes. As an example, if your IP address is 1.2.3.4, type \\1.2.3.4\ then hit browse.

You’ll be prompted for your Mac’s credentials, then pick a path of the items you’d like to map. This could be a folder or an entire drive. As long as you’ve set it up in the step above, you’ll be able to browse it. The wizard will prompt you for a meaningful name of this path (let’s call it Mac Desktop) and that’s it! From now on your Mac folder can be reached from within Windows.

