![]() I really like the Distraction Free Writing Mode that WordPress offers. I mean the one you can access when you write a new post, then hit that big X and go into full screen mode. It’s Zen at large.
I really like the Distraction Free Writing Mode that WordPress offers. I mean the one you can access when you write a new post, then hit that big X and go into full screen mode. It’s Zen at large.
But just in case there’s a single function you’d like to see up there as a button, because you’re using it all the time, there is a way to do it.
Bear with me. These are the buttons I mean:

Default Buttons in Full Screen Mode
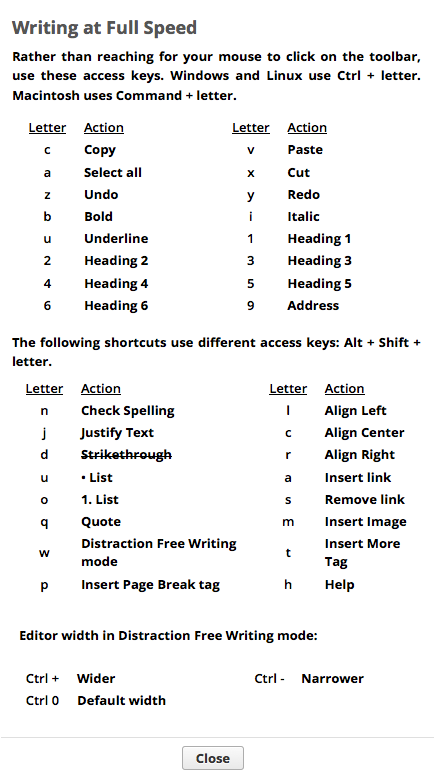
Just in case you didn’t know: there are A LOT OF OTHER FUNCTIONS you get in this mode, much of which are hidden by the power of keyboard shortcuts. See that little question mark up there? Press it and see what else you can access at the speed of thought:

Seriously, this is dynamite stuff! Chances are that if you’re looking for something, it’s already there – and at the ready with a keystroke.
Anyway, let’s get back to that toolbar and see how we can tweak it.
Adding Buttons in DFW Mode
All that beautiful functionality is provided by an open source library called TinyMCE, a JavaScript WYSIWYG editor. That’s the tool that lets you see a word become bold while you’re typing it in your web browser. It’s powerful stuff, and WordPress relies on it a great deal.
So really, all those buttons and their respective functionality is not coming from WordPress. Here’s a list of other functions that could potentially be up there as buttons:
In this example I’m adding the three justifications to the editor: left, centre and right. Add this code to your theme’s functions.php file, or if you’re writing a plugin add it to your main plugin file:
function yourFullscreenButtons($buttons) {

	$buttons[] = 'separator';

	$buttons['justifyleft'] = array(
		'title' => __('Left'),
		'onclick' => "tinyMCE.execCommand('justifyleft');",
		'both' => false
	);

	$buttons['justifycenter'] = array(
		'title' => __('Center'),
		'onclick' => "tinyMCE.execCommand('justifycenter');",
		'both' => false
	);

	$buttons['justifyright'] = array(
		'title' => __('Right'),
		'onclick' => "tinyMCE.execCommand('justifyright');"
		'both' => false
	);

	return $buttons;
}
add_action ('wp_fullscreen_buttons', 'yourFullscreenButtons');
I know it looks a lot, but it’s relatively simple. Let’s go through this:
- First we’re adding a function that gets called via the wp_fullscreen_buttons action. As you may imagine, this is called when the entire toolbar is displayed in fullscreen mode.
- Our function takes a parameter ($buttons), which is an array of button objects that will show up there. We take it and add to the array with our own buttons.
- The first item we’re adding to the array is a separator, just so that our own buttons appear with a little distance. Take it out of you don’t like it.
- Next up are three button objects. We’ll talk about those more in a moment
- Finally we return the amended array and WordPress can display it.
Each Button is made up of three ingredients: a Title (Left, Right, Center) which is displayed on hover. It also needs a TinyMCE function, which is the JavaScript onClick function that will make the selected text do what it does (i.e. justify it to the right). You’ll find the possible values in the link I mentioned earlier. And there’s a boolean TRUE/FALSE type value. This determines if the button shows up in the visual editor only, or if it also shows in the code editor.
The result looks like this:

Not only does it look swish, it also works out of the box! Is that cool or what?
Thanks to the following links for helping me figure this out:
