I’ve often wondered how to use those efficiently, and I’ve just found out how to do it. As always, they’re not difficult to implement – but not documented in a way that simple folk like me can understand it. Be that as it may…
Preprocessor Macros can be useful if you’d like to compile two different versions of the same Xcode Project, such as a Lite and a Pro version, or a separate iPhone and an iPad version. Rather than create separate Xcode Projects for each version, you have one project with two targets. Each target can build a different version from your code, making maintenance much simpler than having to change the same code in two projects.
How do they work?
Preprocessor Macros are directives executed by the compiler, so they’re not part of Objective C. We’ve used them many times before with the #import statement. But to stay with our Lite and Pro example: you can use a Preprocessor if/then statement to check which version is being compiled. For this, let’s define a Macro for the Pro version. Here’s how in Xcode 4.6:
Let’s define one
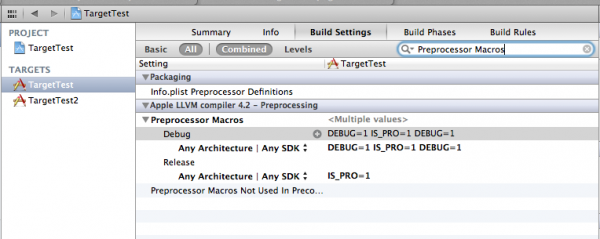
Click on your Pro Target, head over to Build Settings and search for Preprocessor Macros. You’ll see something similar to the above screenshot. You can set Macros for each build configuration. By default we have two: Debug and Release. Notice that the Debug configuration already has a Macro defined – it’s called DEBUG=1. Therefore out of the box you can already check in your code if it has been compiled with the Debug or Release configuration.
To define your own Macro, click the little plus sign next Debug (and Release) and add something specific. I’m using IS_PRO=1, but you can choose anything you like really. I don’t know if you can set values other than boolean. Make sure you set your Macro in BOTH configurations, otherwise you’ll find different results when you submit your app.
How to check them in Code
Now that your Macro is defined, you can check if it’s present in your code like so:
#ifdef IS_PRO
    NSLog(@"It's the PRO version");
#else
    NSLog(@"Must be the LITE version");
#endif
And that’s all there’s to it! This makes most sense with Targets which we’ll discuss next.

