I re-utilise my hard drives from time to time, and as such I need to re-purpose partitions when I do. Operating systems have a habit of adding additional protected partitions when they’re installed as a boot drive, and when we want to use them as storage drive we don’t need those. So let’s delete them.
Thing is, protected Recover Partitions aren’t so easy to get rid of. In this article I’ll show you what worked for me on Windows 10, using a second drive that once was a boot drive.
Disk Cleanup (Prep Work)
The first few partitions (System Reserved and the Primary Partition) can be removed with the Disk Management Tool. Search for it in the bottom left hand corner to find it.
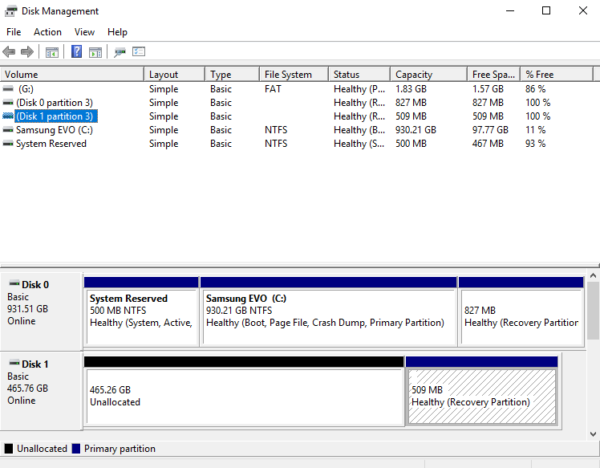
In this screenshot I’m dealing with Disk 1, and I’ve already removed the two additional partitions simply right-clicking on them and choosing Delete Volume. This doesn’t work with the Recovery partition though. We need to use a tool called DISKPART for this.
Enter DISKPART
To start it, bring up an elevated Command Prompt. To do that, search for “cmd”, then right-click to choose Start as Administrator. This will bring up the Windows Power Shell. Type diskpart to start the tool.
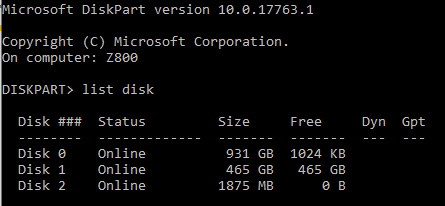
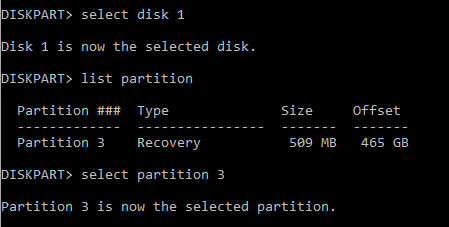
Type list disk to display a list of disks on your system. I’m after a partition on Disk 1, so I’ll choose that. Type select disk 1, the number being the disk of your choice. Now we’ll proceed to select a partition by the same pattern: list partition to show what we have, followed by select partition to pick the one we want to work with. In my case, that’s partition 3. Pick the appropriate one.
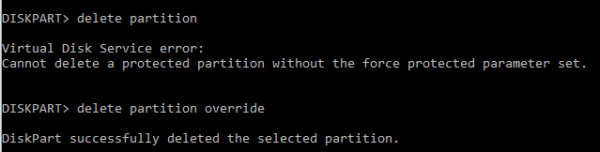
Now comes the fun part: removing the partition. The command is delete partition. This will remove whatever is currently selected. Since we have Admin privileges, this can have disastrous consequences. But we like living on the edge, so let’s go for it.
When we try this however, the following error message shows up: Cannot delete a protected partition without the force protected parameter set. What Windows is trying to tell us is that it needs another parameter to make this magic happen (without telling us the actual parameter of course).
You can read more about it by typing help delete partition, or simply type delete partition override to make it happen.
And that’s it! Take a look at your Disk Management Window to find that the Recovery Partition is now gone, and all you’re left with is unallocated space. Sanity has been restored.
Until next time.