![]() Installing WordPress Multisite can give your site the benefit of being part of a network. I use this feature to spawn multiple installations that live on the same domain. It makes my life so much easier to update several WordPress instances at once. It’s also a great way of being logged into several individual sites at the same time.
Installing WordPress Multisite can give your site the benefit of being part of a network. I use this feature to spawn multiple installations that live on the same domain. It makes my life so much easier to update several WordPress instances at once. It’s also a great way of being logged into several individual sites at the same time.
WordPress Multisite isn’t for everybody, and not every hosting company will allow you to install or use it. It will however work with most hosting packages that support a standard WordPress installation.
Let me talk you through the installation process and the caveats you may encounter. The current installer that comes with WordPress 3.8 is excellent at giving you guidance on what to do. Note that you cannot install Multisite on localhost installations (MAMP, Wamp Server, etc).
Starting from scratch
We’ll start with a standard single WordPress installation, created by a one-click installer from Plesk 11.5. Multisite can be installed in two ways and it’s a good idea to think about how you’d like your sites to appear:
- as subfolders, such as http://example.com/site1 and http://example.com/site2
- as subdomains, such as http://site1.example.com and site2.example.com
It is the latter way of installing Multisite that usually causes trouble because it requires domain wildcards to be setup correctly. To avoid this problem we’re going to use the first option and go with subfolders. At this point I assume your single instance is working correctly.
Permalinks
Multisite only works if any form of Permalinks are activated. The default is set to the very first option in the list (?p=123) and we can’t have that. Choose any of the options, I’m going with the option called Post Name:
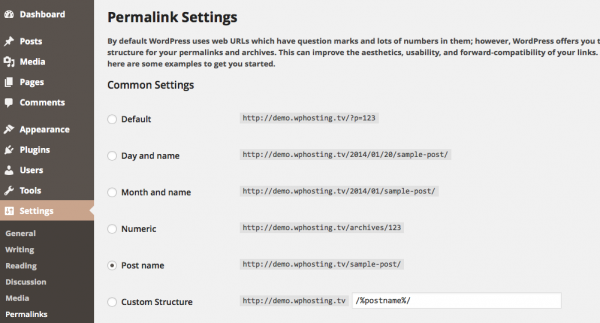
Hit save and you should be greeted by the message “Permalink Structure saved”. This will save Apache ModRewrite rule changes to your .htaccess file and tells the web server how to re-write URLs in the browser that’s visiting us. Sometimes this file is not writable, in which case WordPress will instead display what you need to manually add to this file as a block of code.
Tweak wp-config.php
Now it’s time to add a line to your configuration file. This will tell WordPress that you’d like to install the Multisite environment. Add the following to your wp-config.php file, just above the Authentication Keys will work fine (roughly in line 35/36):
/** Multisite Setup **/
define('WP_ALLOW_MULTISITE', true );
Save the changes, then upload the file back to your server and refresh the Admin Interface. At first glance, nothing appears to have changed (which is a good sign).
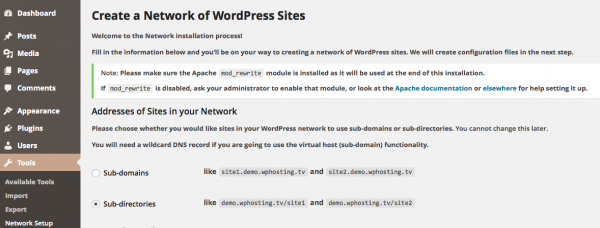
Activating and Installing “The Network”
Navigate to Tools – Network Setup, which is a new option that’s become active since we’ve fiddled with that configuration file. Choose how you’d like to install the network (subdomains or subfolders, as explained above), give your new network a catchy name and verify your email address.
Choose option 2 (subfolders) to avoid complications, then hit Install:
WordPress will get back to you with two blocks of code, specific to your installation. Please copy and paste from what WordPress will give you, this is for illustration purposes only
The first block needs to go into your wp-config.php file which we’ve patched earlier. Directly underneath the line that specified “allow multisite” (roughly line 37/38).
The final result should look like this:
/** Multisite Setup **/
define('WP_ALLOW_MULTISITE', true );
define('MULTISITE', true);
define('SUBDOMAIN_INSTALL', false);
define('DOMAIN_CURRENT_SITE', 'example.com');
define('PATH_CURRENT_SITE', '/');
define('SITE_ID_CURRENT_SITE', 1);
define('BLOG_ID_CURRENT_SITE', 1);
The second block is something for your .htaccess file and will replace the current Permalink structure we’ve setup earlier. WordPress Permalink Tweaks usually start with #BEGIN WordPress and #END WordPress. Anything in between those lines needs to be updated with the code WordPress will give you.
Your .htaccess file should look something like this when you’re finished:
# BEGIN WordPress

RewriteEngine On
RewriteBase /
RewriteRule ^index\.php$ - [L]

# add a trailing slash to /wp-admin
RewriteRule ^([_0-9a-zA-Z-]+/)?wp-admin$ $1wp-admin/ [R=301,L]

RewriteCond %{REQUEST_FILENAME} -f [OR]
RewriteCond %{REQUEST_FILENAME} -d
RewriteRule ^ - [L]
RewriteRule ^([_0-9a-zA-Z-]+/)?(wp-(content|admin|includes).*) $2 [L]
RewriteRule ^([_0-9a-zA-Z-]+/)?(.*\.php)$ $2 [L]
RewriteRule . index.php [L]

# END WordPress
Save both files and upload them back to your server. Once done you can follow the handy Log In link at the bottom of that page or just click on the Dashboard option. You will be prompted to login again.
Welcome to your new Multisite Network
Nicely done! You’re back in your main site’s Dashboard and all looks well (I hope). You will notice a couple of extra options at the top to administer the sites in your network.
The Multisite philosophy is very different from single site installs. For example, themes and plugins can no longer be installed via their respective menu options, they can only be activated or deactivated. These powers no longer belong to the Administrator role, they have been given to the Super Admin instead.
We’ll get into how to use WordPress Multisite in another article though.