
I control most of my local computers around the office with NoMachine. It’s the only client that lets me start several GUI heavy apps from the command line without running into some type of issue (like OpenGL driver shenanigans). You can download it from NoMachine.com for free, and I absolutely love it.
One thing that’s been bugging me though is that when I connect, the resolution of my source monitor is always matched on the client. In my case, that’s a 2K monitor on my Mac, and the resolution is a whopping 2560×1440. Quite frankly that’s often too much for the machine I’m connecting to, and it doesn’t make for the best viewing experience at my end with scroll bars left and bottom. I’d much rather have it be set to 1920×1080 every time as a default, without having to manually change it every time I connect.
Thankfully there’s a way to do this, and I’ve just worked out how it works! Here’s how to do it:
- connect to your destination as usual
- head over to the Display Settings (usually top left active corner – Display – Change Settings)
- choose a resolution with the slider, or enter a custom resolution (enable the tick box)
- IMPORTANT: uncheck the option “Match client resolution upon connecting”
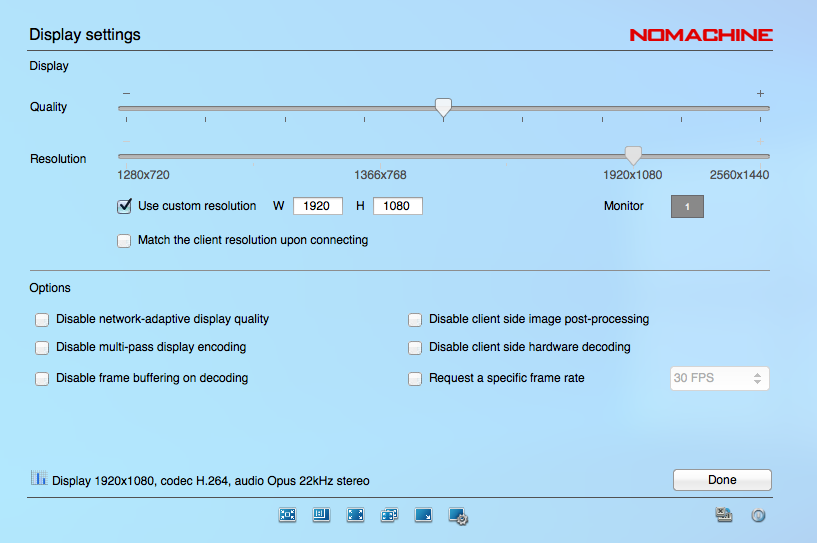
The last point appears to be the most important one. If left unchecked, the client’s resolution is used instead of what we specify with the slider or the entered values. Now you disconnect and reconnect from your client with the resolution of your choice.
Another network mystery solved!