OBS has a super neat feature that works great if you’re narrating over an existing audio track. It’s called Sidechain/Ducking, and it will automatically lower the audio of one source if an audio level is detected on another source. For example, when you’re playing a game, the audio would be lowered when you speak, and when you’re quiet the game audio could be played higher. It’s like MAGIC!
In this article I’ll show you how to set it up, and the values that I’m using for some of my streams.
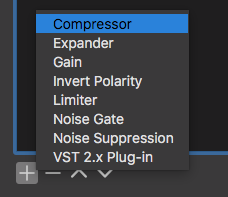
Adding the Sidechain/Ducking Compression Filter
On the audio source in question, apply a filter. You can either right-click on the source in question, or use the little cog icon in the Audio Mixer for that. Add a Compressor filter and call it “Sidechain Compression”, or another identifiable name.
The default values work OK, but I’m using these as I find them more pleasing:
- Ratio: 32:1
- Threshold: -40dB
- Attack: 250ms
- Release: 500ms
- Output Gain: 0dB (default)
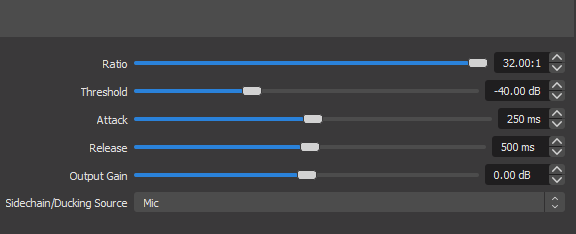
The important bit is set at the bottom, which which we can pick a Sidechain/Ducking Source. Set this to your microphone source from the drop-down menu. That way the Compressor knows which other source to listen to and apply the effect. When a level above a certain threshold is detected, the filter kicks in. Anything below that will not trigger the filter.
It’s worth doing some test recordings to see which exact values suit your needs. To figure out the threshold, take a look at the audio meter while you’re not speaking into your mic. You’ll see some low level noise on the left, know as the noise floor. Make sure to set the sidechain threshold to somewhere above that level so that it won’t trigger accidentally.
Have fun!