I’ve been experimenting with OBS NDI recently, and although it may not be as relevant in 2020 as it once was, I thought it best to take some notes on how to make a dual-PC streaming setup work before I forget. It’s pretty straightforward. Here’s what we need:
- two computers on the same network (wired for best results)
- two installations of OBS, one on either computer
- the OBS-NDI plugin installed on both systems
I should mention that this will with a wireless network, but it can lead to lower frame rates due to data throughput. Essentially the main PC will send its entire OBS scene more or less uncompressed over the network, at a very high data rate, only to be properly compressed on the second PC that will do the actual streaming. However, we can still switch scenes on the main PC in OBS just as we always do.
Let’s get this going!
Main PC Setup
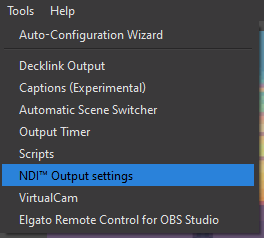
Once installed, take a look under Tools and find NDI Output Settings. Select it. If you don’t see this option, the NDI plugin is not installed properly.
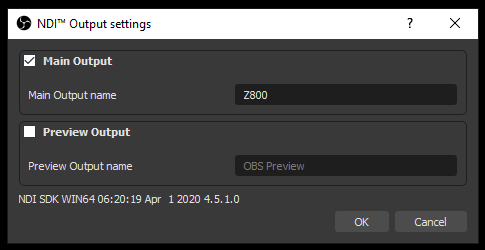
We’ll see two options, a Main and a Preview. Tick the Main option and give your machine a name (preferably without spaces) so that the Streaming PC can pick it up. As soon as this box is ticked, all data can be pulled in on the Streaming PC.
We can now switch scenes on our Main PC, and offload the whole compression thing on other Streaming PC. Note: I had to restart my Main PC after setting this up, probably a Windows thing. Just in case you don’t see it in the next step, try that first.
Streaming PC Setup
On the Streaming PC we need a single empty scene, into which we’ll add a single source – namely the NDI Source. We’ll configure it in a moment, but essentially this scene is everything that the Main PC outputs – including scene transitions and audio.

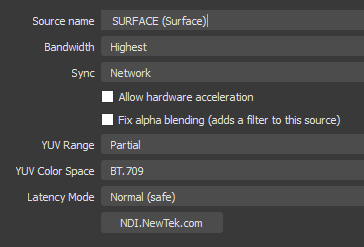
In the configuration window for this source you should be able to select the Main PC, identified by the name you’ve given it. Feel free to experiment with the values such as Latency Mode and Colour Space.
With this single scene visible, you can start streaming (or recording) on the Streaming PC.
Important Notes
The image size and frame rate should be set to the same values on the Main and the Streaming PC. You can resize the signal on the Streaming PC just like with any other scene, but if you want to stream say 1920×1080 at 60fps, it’ll have to be set on either system. You don’t want to up-res anything if you have to, and you also don’t want to push too much data around your local network only to downsize the image or frame rate convert on the Streaming PC.
Note that changing these settings on the Main PC can only be done by unchecking the NDI Output Settings tickbox first (from Main), otherwise those settings will be greyed out. It’s clumsily put I know, but you’ll see what I mean when you try it out.
Depending on the configuration of the Streaming PC you can set the encoder settings as you see fit. For example, with a fast CPU, x264 at Fast or Medium will look fantastic. For systems with a capable GPU, NVENC at Quality or Max Quality will also look amazing. The advantage of the dual- PC setup is that we can allow for a maximum usage of system resources, without having to find a compromise between gaming and stream performance.
Something to be aware of: a small bit of latency is introduced due to the additional trips on the network. With the regular Normal (safe) setting, it’s around 1 second or less. Low latency mode worked fine in my tests and added less than one second. Not major, just something to keep in mind.
Further Reading
- OBS-NDI on GitHub: https://github.com/Palakis/obs-ndi/releases
- Detailed setup guide on Stream Elements
- Official Newtek NDI Homepage: https://www.ndi.tv/