Updating to the latest version of OS X is tempting – but there’s always a risk that some of your older apps may stop working. If only there was a way to “rehearse” the update process on a dummy system.
I’m happy to tell you that there is, and it’s neither as expensive as a brand new computer, nor as time consuming as recreating your entire system from a time machine backup. In this article I’ll show you how.
Here are the ingredients you’ll need:
- 1x external USB drive, bootable (Seagate Backup Plus, WD My Passport, any of those – USB 3 preferred)
- 1x copy of Shirt Pocket’s SuperDuper (don’t judge them by their name)
- 1x fresh pot of coffee
- patience and 1-2hrs of uninterrupted time
The Principle
Copying your entire hard drive and isolating every file takes a long time – especially if you don’t have USB 3 (like me). Transferring 500GB or more will take over 24 hours, perhaps longer. No can do.
Enter SuperDuper! It’s a utility with which you can do something even better. I got hold of a copy a few years ago when I replaced my internal MacBook Pro hard disk with an SSD. The free version does a complete clone, but it also has a feature called Sandbox which you can access when you buy the full version.
Sandbox does not copy all files over to an external drive. Instead, it copies user and system files and leaves the rest untouched. It still creates a bootable volume, so all mission critical data is isolated (including Mac apps like Safari, Mail, iMovie, etc). But all your other 3rd party apps, as well as your Documents and Desktop are shared and remain untouched.
When I say shared I mean that after you’ve finished creating the Sandbox on an external drive (or even an internal partition) you’ll be able to choose which system you boot into and access all your data either way.
This is done cleverly by creating symbolic links to your internal drive for everything that the external drive would need to access. It’s like shortcuts in Windows.
Creating the Sandbox Drive
Grab your external drive, plug it in and erase it using Disk Utility (Applications – Utilities – Disk Utility). Make sure your partition is Mac Extended Journaled flavour (not NTFS or anything else).
Next, download a copy of SuperDuper from Shirt Pocket. You need to buy the full version to get access to the Sandbox feature. However, if you’re strapped for cash and have a lot of time on your hands, you can still perform a full clone instead – that’s part of the free version. It just takes a little longer.
Start SuperDuper and you’re presented with a dialogue similar to this:
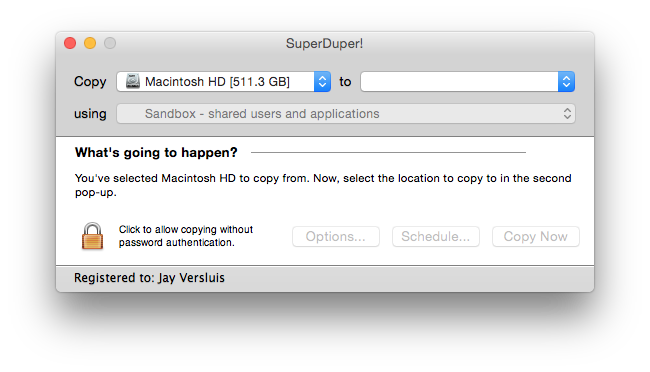
Under Copy select your current (internal) drive. In the other dropdown select your target (external) drive. You’ll see several options in the third drop down which reads “Sandbox – shared users and applications” in my screenshot. Select this option.
Other options include a full backup, as well as Sandbox – shared users. The latter copies all your 3rd party apps so will take more time, and it’s not necessary for our exercise here. Hit Copy Now and grab a coffee – this could take some time.
SuperDuper will go ahead and erase your volume and will tell you when it’s finished.
Booting into the Sandbox
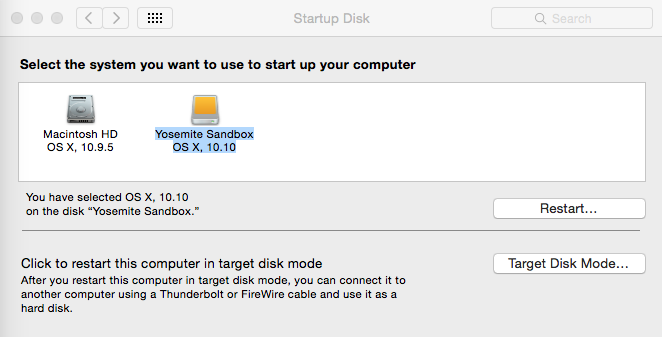
With your external drive still attached, head over to System Preferences – Startup Disk. Select your external drive here. Hit Restart and your Mac will boot into the external Sandbox. This will take a little longer than usual, simply because the read speed from an external volume is much slower than an internal SATA drive – especially if you’re used to an SSD or Fusion Drive.
Once restarted you may not notice any other differences. Dropbox didn’t want to work for me, but other than that my system looked exactly like I had left it. With one big and important difference of course: under Applications I can now see many of my app icons with a small arrow in the bottom left corner:
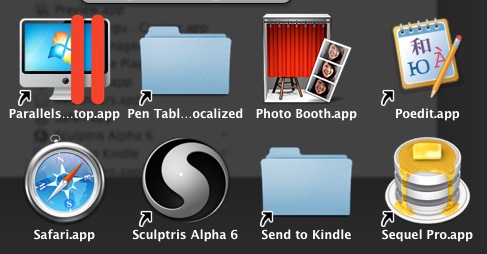
That arrow indicates a symbolic link (shown here on Parallels Desktop, Poedit and Sculptris). If I were to launch one of those they would be started from their original location, i.e. my internal hard disk. Other apps like Safari and Photo Booth don’t have an arrow – those are started from my external drive because they’re classed as “system apps” and have been copied over.
If an upgrade like Yosemite comes along it will overwrite all those system apps and other system files – but only on the external drive. If this messes anything up then all I have to do is head over to System Preferences and boot into my internal drive again – still untouched, still running Mavericks and still working fine.
Now you can “test upgrade” to Mavericks on the external drive and see if all is working. Take your time and test everything thoroughly. I found that the older drivers for my Wacom Bamboo 1st Generation are no longer working – my Intros 4 however has a different driver and is still working fine (contrary to what I thought at first when I made the video).
Upgrading the Sandbox to Yosemite
There are probably better guides out there that tell you exactly how you upgrade, so I’ll just give you a few pointers:
- open App Store
- head over to Updates (or click that massive Yosemite mountain on the front page)
- download the installer
- wait
Once the 5+GB have downloaded (straight into Applications – Install OS X Yosemite.app) you may want to copy this file to a safe place. This will save you a second download when you decide to install Yosemite for real. This installer will be removed automatically when Yosemite has finished – so now’s your chance to grab it.
And one final tip: you may need to install Java for OS X in case some of your apps don’t start under Yosemite. If that happens OS X will show you a little dialogue box and direct you to the following link when you click More Options: http://support.apple.com/kb/DL1572
Done with Yosemite?
If you want to go back to your previous system, simply head over to System Preferences – Startup Disk again and select your internal drive, then restart. No matter if your sandbox is still plugged in or not, you’ll be back on Mavericks with no system changes.
Updating the internal drive (when you’re ready)
If you’re happy that your system will survive the update, go ahead and update via the installer, or download the installer again from the App Store. This will take some time (again).
If you’re impatient, you’ll be pleased to hear that SuperDuper also offers to copy changes from the Sandbox back to the internal drive. It will tell you all about this in the documentation, under the section “Maintaining a Sandbox”. It’s worth the read.