We just started using that Discord thing everyone is talking about. It’s really easy to setup your own server, but with such great powers come great responsibilities.
We wanted to run a private invitation-only server and see how it would work for our team, but an obvious caveat was that everyone who had joined could send invitations to others willy nilly. It was not really obvious for me to fix this, until I did some digging. Here’s how to remove the default invitation setting from @everyone, and a brief explanations for new Discord Server Owners.
Discord Roles
Discord allows users to be added to one or multiple roles. Those are collections of permissions, which don’t have to begin with the @ symbol. Only one role (@everyone) is define by default, the rest is up to us to define. For example, we could create an “admin” role or a “moderator” role with different permissions to @everyone.
These roles act server wide and within all channels, however channels can override permissions set in roles. For example, @everyone could be disallowed to do something, while in one particular channel, one or two members could be granted that privilege. This makes it easy to add exceptions to people without having to create a new role just for them.
We can define server-wise roles by clicking on that little chevron-like icon at the top left, next to the server name (The WP Guru in my case). Click it to reveal a drop-down menu. Select Server Settings.

Choose Roles from the menu on the left hand side, then pick the role for which you’d like to amend the permissions. Select @everyone, since that’s the only role everyone is currently assigned to (on a new server anyway).
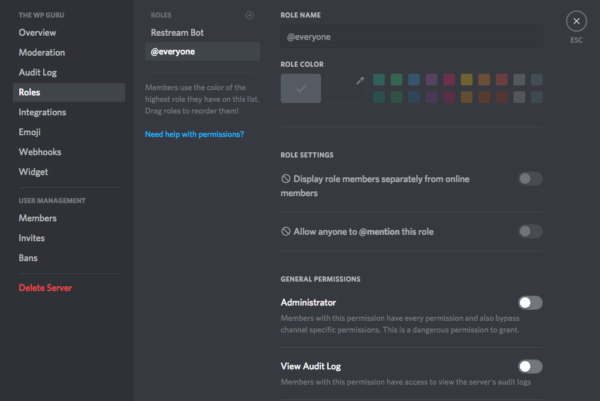
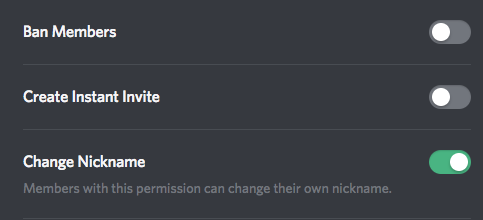
It’s a little hard to see, but the third column from the left is actually much longer than what fits on the screen. Scroll down to discover a plethora of permission settings, one of which is Create Instant Invite. It’s enabled by default. Flick that little green switch until it’s grey.
A little menu should pop up at the bottom, telling you that you’ve got unsaved changes. Hit Save Changes, and nobody can invite people anymore (except for you, Alright Administrator, who as the Server Owner is above all roles).
Creating New Roles
While you’re here, perhaps you’d like to create a new role for those people who you’d like to allow to send permissions. Click the little plus icon next to the Roles menu and create a new role for your team. Any name will do, perhaps we’ll stick to @admins. Give them a nice colour if you like.

Give or remove any permissions you see fit. I’m going to allow my admins such privileges like deleting messages, edit user names, allow to kick and ban users, and so forth. When you’re done, hit save.
Adding Users to Roles
On the same page as you are, there’s a section called User Management on the left hand side. It’s just above the big red Delete Server option.

You’ll see a long (searchable) list of users. Click the plus icon next to one of them to add them to your new role. Users can be members of more than one role at a time.
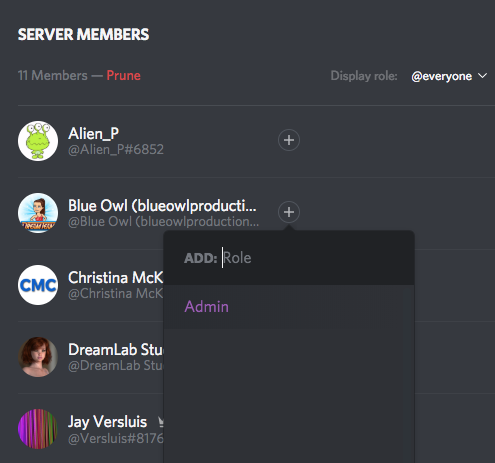
Changes take effect immediately and do not need to be saved with a button.
Channel Permissions
You can also set permissions on a per-channel basis. For that, head over to our channel’s gear icon and select Permissions.
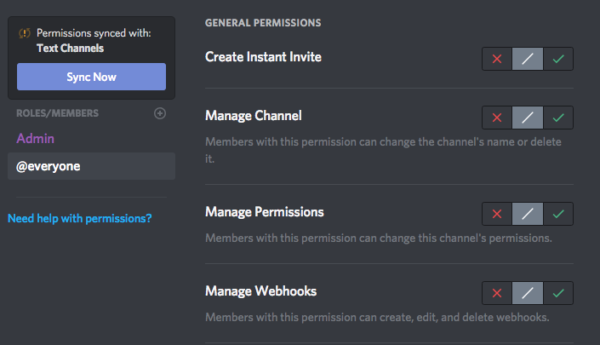
What I found super confusing is the legend on the right, with a red x, a grey slash and a green tick. These settings let you override the permissions a particular role has:
- the green tick means “allow”
- the red x means “disallow”
- and the grey slash means “leave as denied server-wide” (or “no change to what’s in place”)
New Roles will not automatically show up until you click the plus icon next to Roles/Members. This too is a tad confusing: you can add a whole role here, then redefine those permissions specifically for this channel; but you can also add a single member here and give him/her particular permissions that are outside the scope of whatever is defined server-wide.
A usage example would be a regular user in the @everyone role who cannot send permissions, except for one particular channel that he/she’s a member of.
To remove an overridden role or user from the list, scroll down to the bottom and select the “Remove” option.
That’s all I have for now. I hope it helps you getting started in the wonderful world of Discord Server Administration 