I’ve been struggling to route and monitor some of my audio sources in OBS. Thankfully I’ve found two essential tools that make this possible, and I thought I’d jot down some notes in case I forget.
I’ll also touch on how to monitor audio properly without causing an endless loop by recording what you’re monitoring.
The tools we need for ultimate success are:
In principle, we use the latter to route a source into the VB-Cable (a virtual destination), then we pick up the VB-Cable output as a separate input in OBS. We can then adjust its levels independently from other sources or apply filters if necessary. This all sounds more complex than it really is, so let me illustrate this with an example.
Installation Notes
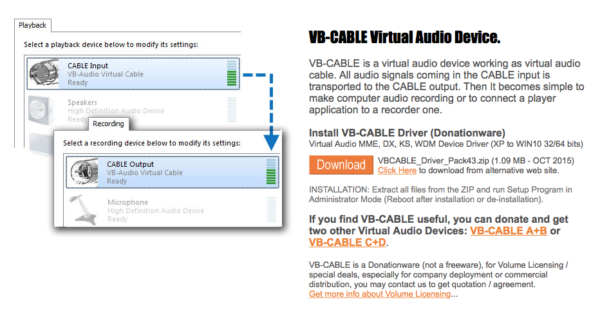
VB-Cable installs like a regular app on Windows, and does not need to be started. It’s like a permanent audio device driver on your system. There are three versions in total: the free VB-Cable, as well as two donation ware items called VB-Cable A/B and C/D. We don’t need those, but if you ever require more than one routable audio destination, give them a try. Either one will get you two more destinations.
I took this screen grab so illustrate which download button to click for the regular VB-Cable:
Audio Router doesn’t need to be installed. Simply download the ZIP file of the latest release under the GitHub Releases Section of the repo, UnZIP it into an accessible folder and you’re done. You’ll have to start Audio Router every time you need it, and from what I can tell your settings are not automatically saved (if there’s a way, I’ll let you know).
Example: Routing Stream Deck Sound Board Effects
In my example, I’d like the audio output of my Stream Deck Sound Board effects to be on a separate input in OBS. That way I can adjust their volume independently from the game’s audio. The problem is that both audios are mixed into the Desktop Audio by default, so I’ll record both sources at the same time.
With our new magic setup, we’ll route the game audio and the Streak Deck effects via separate sources and the problem is solved. All I need to do is to use Audio Router to choose the Stream Deck’s output and send it to the VB-Cable. Your source doesn’t have to be a Stream Deck of course, the principle will work for any source you have on your system (say a browser tab or a video player).
Note that the source needs to have played audio at least once for it to appear in the Audio Route list. On my system, Stream Deck doesn’t appear unless I’ve played a sound – even though the software is already running.
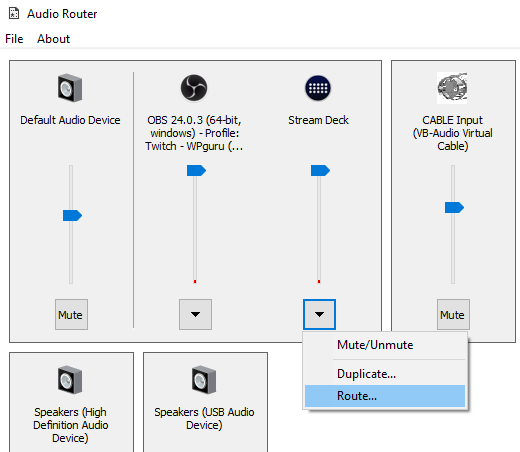
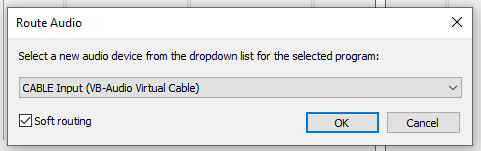
Each virtual source has a little triangle at the bottom. Click it and select Route, then pick a destination. The option Soft Routing works well for me, but to be honest I have no idea what it actually does.
That’s all we need to do in Audio Router. Now we’ll take a look at OBS and it’s Audio Input options (under Settings – Audio).
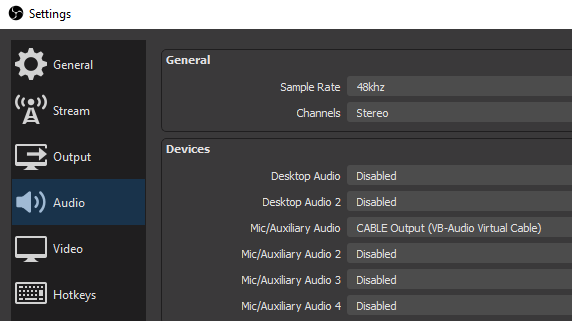
Under Devices you’ll find a list of audio sources that OBS can use without a scene. The labels don’t necessarily match what you’re going to use them for. I’m picking the Mic/Aux Audio input for my Stream Deck, and select the VB-Cable as it’s device. This means that on the OBS main page, in the Audio Mixer window, I can now see this source as a separate input, complete with the option to add effects and adjust levels.
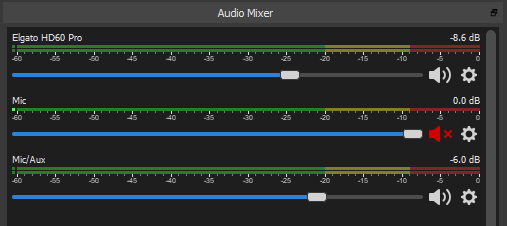
Also notice my Elgato game capture card, which has a separate input. This could be a captured window from my PC or any other source.
That’s Part 1 done and dusted, now let’s take a look at how we properly route audio for monitoring.
Monitoring your Audio in OBS
The OBS Audio panel allows us to set a dedicated device for monitoring our audio. That’s a better way to work than relying on the “Windows Default Device”, which is enabled by default. The trouble with that Windows Default Device is that it may change depending on what’s connected to our system at any given time. USB and Bluetooth devices may come and go during a session, which often results in our audio seemingly getting lost.
Head back to Settings – Audio in OBS and take a look at the Advanced section. It has a drop-down from which you can select the device you want to listen in with. Select as appropriate, then hit Apply and OBS will monitor with that device (even when you’re already live or recording).
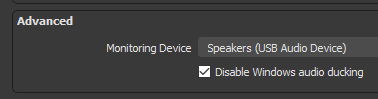
I like to disable the option of Windows Audio Ducking, which takes care of levelling out two or more sources that are playing at maximum levels. It’s there to avoid distortion, but it can get in the way of our mixing. It’s personal preference though.
Enabling Sources for monitoring
The final piece in the puzzle to actually hear our devices is to set them up to be monitored. You may not want to hear everything in your own “in-ear mix”, for example your microphone. That would just drive you crazy! By default, all sources are disabled for monitoring in ONS. You can change this from the main window, namely via the Audio Mixer.
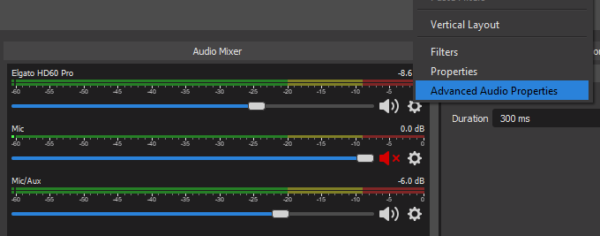
Take a look at the little cog icon and select it, then choose Advanced Audio Properties. This will bring up a window with all your sources and many other fancy settings. Don’t be dismayed, all we need to take a look at here is the Audio Monitoring section, featuring a drop-down for every source.
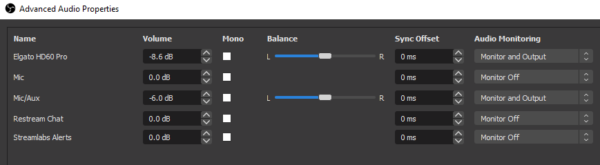
Monitor Off is the default option, and as a result you don’t hear the source when you listen (you’ll still record or stream it though). Setting a source to Monitor and Output will make it available for your stream/recording as well as for your listening pleasure.
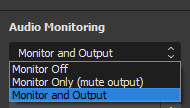
Just in case you’re curious, the second option (Monitor Only) will let you listen to something without it appearing in the final mix. Say your favourite soundtrack that’s sadly copyright protected, or a relaxation podcast while you’re playing a shooter game. You get the drift.
Conslusion
That’s all I have on this topic, which is a complex one indeed. There’s more to it, but I’m hoping this little introduction was helpful to get you going. If you have any questions about this, leave me a comment below.
Happy Streaming!