![]() Installing WordPress Multisite isn’t the hard part – it’s getting your head around how to use it, especially if you’ve mostly been using single installs. In this quick tour I want to give you some pointers on how to use your new installation, and how it differs from single WordPress installations.
Installing WordPress Multisite isn’t the hard part – it’s getting your head around how to use it, especially if you’ve mostly been using single installs. In this quick tour I want to give you some pointers on how to use your new installation, and how it differs from single WordPress installations.
New Role: The Super Admin
On a single installation, the Administrator was the “master of your domain”. In a Multisite installation however he no longer has the powers that he once had. Instead, the Super Admin is now in charge of many of the more intricate options.
Super Admins can create new sites, delete sites, install themes and plugins, assign upload space and upgrade WordPress along with themes and plugins from a central location. Administrators can no longer do such things.
As a (once single site) Administrator having converted your site into a Multisite environment your user automatically becomes a Super Admin upon conversion. Hence you have two different dashboards to go to: a Network Dashboard, and a Site Dashboard. That can be very confusing when you’e first confronted with the concept.
What once was the Main Site
After the upgrade to Multisite your previous site is now part of the network, by default appended with “sites”. So if your single site was called “Demonstration”, then WordPress will now call it “Demonstration Sites”. You can simply rename it if it’s not to your taste.

New Menu Option: My Sites
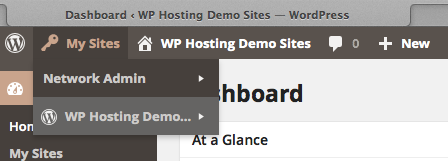
At the top of the admin bar you’ll see two options: “My Sites” and “Your Site Title”, both of which have the usual drop down menus upon hovering. The latter option is the current site you’re administering and works much like what you’re used to from single site installs.
My Sites is different, and perhaps better known to WordPress.com users who have more than one blog. My Sites will show you each of the sites you’re a member of, and provide handy links to each site’s Dashboard and options. Right now you may only have one site, so this menu will make much more sense when you start creating your second and third site in a moment.
Themes and Plugins
In Multisite, only the Super Admin can install the above, and decide which are “Network Enabled”. This means that once installed, a theme or plugin can be made “available” to site users, who in turn can configure or activate the enabled items.
When themes are network enabled, site users can choose which one to activate. Network enabled plugins on the other hand are active immediately on each site, but not necessarily configured (Akistmet for example requires an API key for each network site).
Creating New Sites
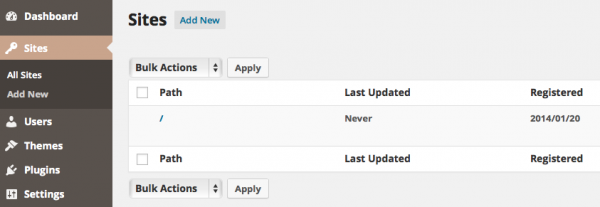
Navigate to My Sites – Network Admin – Sites to see a list of current sites in your network. From here, use the Add Site button to create a new site. Give it a name, permalink and email address for the administrator (use your own if you’d like to be one yourself).

This will create a new set of tables in the database, but use the same WordPress files on disk to serve each website. Single installs have 11 magic tables, Multisite has 17, and will add another 9 for each additional site in the network – with a different prefix for each site.
Uploaded files are still stored on disk under wp-content/uploads, but now each site has a subdirectory which coincides with the Site ID in the network, followed by year/month folders. For example, a new file for your first site may be stored as wp-content/uploads/2/2014/01/yourfile.png. Note that those directories are only created when you’re uploading a file.
Deleting, Archiving and Deactivating Sites
WordPress is nice and cleans up after itself: deleting a site will remove all those additional database tables associated with a site, as well as remove all files from the server that were uploaded by said site.
When a site is archived, it becomes read-only, juts for browsing, but it will remain public.
Deactivating takes it offline so it’s no longer accessible on the network. Only Super Admins will see it and can being it back if necessary. This is useful if you want to curb your network, and alternative to deleting sites completely.
Neither option compresses or removes files from the server, nor is this meant to be a “backup option”, as the term archiving may imply.
Multisite Upgrades
Under Network Admin – Updates you can download upgrades for themes, plugins and WordPress core. Once done you will be prompted to “update your network” which will go through each site and apply the necessary database tweaks associated with an update. Depending on the amount of sites in your network this can take some time.
Note that site users no longer need to perform any update operations and are not notified of new theme/plugin versions. It’s now up to the Super Admin to take care of such tasks.
Multisite Settings
Most aspects of your network can be tweaked, from the welcome email text to free public registration, to the amount of upload space each site user is allowed. Explore Network Admin – Settings – Network Settings for a long list of such options.
While you’re here, note the Network Setup section. These familiar code boxes contain your configuration for both wp-config.php and .htaccess files – in case you misplaced those settings.
Creating additional Super Admins
Super Admins can create “users” under Network Admin – Users. By default these are Administrators which can be added to sites in the network. Editing an Administrator allows the Super Admin to tick a box called “Grant this user Super Admin privileges”.
The End
And that concludes the quick guided tour! Let me know if anything is unclear or if you’re still stumped as to how to make Multisite work for you.
